There’s this tiny moment of glory when you yank an onion out of the soil and it smells so strong it almost slaps you—pure garden bragging rights. But timing is everything. Harvest too early and you get sad, floppy onions that spoil faster than your last group chat. Harvest right, and you’ve got crisp bulbs that chill happily for months. Whether you’re already a plant nerd or just dipping your toes into gardening, learning when to pick onions is the cheat code to bigger harvests and way better flavor.
Understanding Onion Growth Cycles
Onions have this whole dramatic life arc—like a TV series packed into one season. They start as seeds, tiny bulbs, or little transplants, then spend weeks flexing their green leaves before finally bulking up underground. When the days get longer or shorter, the plant basically gets a cosmic text message saying, “Yo, stop the leaves, start the bulb.”
Most onions take around three to four months to hit full maturity, but the exact timing depends on the type and where you live. Short-day onions finish faster in southern areas, while long-day onions thrive up north where summer sunlight goes extra hard. Understanding this glow-up timeline helps you know exactly when your onions are ready to shine.
- Read Also: Growing Giant Onions: Pro Tips for Prize-Winning Bulbs
- Read Also: Best Onion Varieties for Containers: Small-Space Growing Guide
The Primary Signs Your Onions Are Ready to Harvest
The Telltale Topple
Onions literally tell on themselves when they’re done growing. Once the green tops start flopping over like they’ve just pulled an all-nighter, the plant is saying, “I’m finished, boss.” When about half your tops have collapsed and turned yellow or brown, that’s your cue. It happens because the plant has ended its leaf-growing era and is officially wrapping up bulb production.
Checking Neck Thickness
A mature onion has a skinny, bendy neck—kind of like it skipped arm day for weeks. If you gently pinch the neck and it feels soft and flimsy, it’s harvest-ready. If it’s still thick and stiff, the plant’s still busy leveling up underground.
Visual Bulb Inspection
You can also sneak a look by brushing the soil away from a few bulbs. Ready onions have that classic dry, papery skin and feel firm—like they’re ready for supermarket glam shots. If they’re tiny or still rocking fresh, moist skins, they need more time. But don’t ghost them too long or they’ll start causing drama.
Timing Your Harvest by Calendar and Weather
Seasonal Considerations
Most people plant onions in early spring, so the big harvest moment usually lands in midsummer—July through September up north. In the south, fall-planted onions wrap up by late spring. The calendar won’t give you perfect answers, but it’s a decent reminder of when to start watching your plants like a hawk.
Weather and Soil Conditions
Dry weather is your best friend here. Pulling onions out of soggy soil is basically begging for rot, and nothing stings like losing months of work to mushy bulbs. Aim for a run of sunny, dry days. If rain is coming and your onions are already showing all the “I’m ready” signs, get them out early. Onions pulled from dry soil and cured right can last half a year—wet-harvested ones barely last long enough for a sad sandwich.
The Harvesting Process: Step-by-Step
Step 1: Stop Watering
About a week or two before harvest time, cut off the water. Think of it like telling your onions, “Alright, fam, time to dry out and toughen up.” This helps their outer skins crisp up and makes the flavor hit harder. Plus, dry onions store way better.
Step 2: Loosen the Soil
When harvest day hits, grab a garden fork or spade and loosen the soil around your onions. Go a few inches away so you don’t accidentally stab one—spearing an onion feels weirdly tragic, trust me. Loosening the dirt makes the whole operation way smoother.
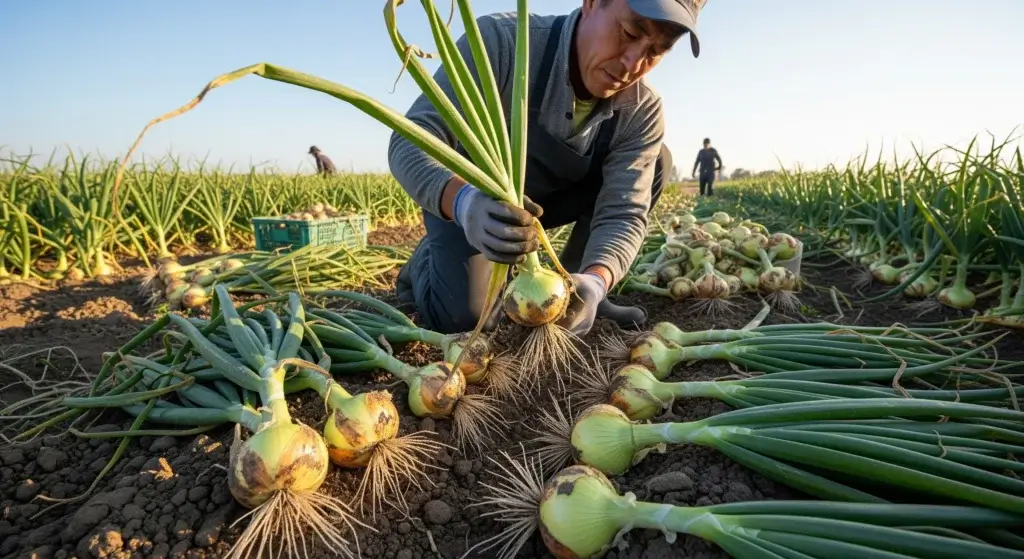
Step 3: Lift Carefully
Grab the onion right where the leaves meet the bulb and pull straight up, slow and steady. If it’s fighting back like it doesn’t wanna leave home yet, don’t Hulk-smash it. Just loosen the soil more and try again.
Step 4: Handle with Care
Lay your onions down gently like they’re fragile little dragon eggs. Bruising or dropping them is basically sending them a rot invitation. Even tiny damage can doom an onion that would’ve lasted months.
Step 5: Initial Drying
Let your onions chill on the ground or a tarp for a few hours so the soil can dry and fall off naturally. If storm clouds roll in or the air feels like a sauna, move them under cover fast. Moisture at this stage is the enemy of long-term happiness.
The Critical Curing Period
Curing is the glow-up phase for your onions. It’s where they dry out, toughen up, and get that classic papery skin that helps them last for months instead of crashing and burning in storage.
Ideal Curing Conditions
Lay your onions in a single layer somewhere warm, dry, and breezy—think 75–85°F and never in direct sun. A porch, garage, or shady spot with airflow works great. They’ll need about two to four weeks to fully cure. Bigger onions or ones with thick necks take longer, because of course they do. You’ll know they’ve finished their spa treatment when the skins feel papery, the roots are crispy, and the necks are totally dry.
Signs of Proper Curing
Once your onions rustle like old parchment and the necks feel bone-dry, they’re officially cured. At that point you can trim the tops down or keep them long if you’re into braiding your onions like some medieval kitchen wizard.
Common Harvesting Mistakes to Avoid
Harvesting Too Early
Pulling onions too soon is like cutting your hair before it grows out—awkward and disappointing. When the neck is still thick, the onion can’t seal itself, so it rots fast. These early birds are fine to eat fresh, but don’t expect them to last longer than a few weeks.
Leaving Onions Too Long
Letting onions chill in the ground forever is just as bad. They start splitting, sprouting weird bonus growths, or inviting every pest in the neighborhood to the party. Once most of the tops flop over, you’ve got about two weeks before things get messy.
Inadequate Curing
Skipping curing is basically telling your onions, “Good luck, hope you survive.” Spoiler: they won’t. Rushed or incomplete curing leads straight to rot city. Give them time to dry fully—it’s worth every minute.
Harvesting in Wet Conditions
Pulling onions from soggy soil is a mistake I’ve made once and swore never to repeat. Wet bulbs trap moisture, and moisture is a rot magnet. Wait for dry weather, even if you have to be patient. Your future self will thank you.
Storage Best Practices After Harvest
Once your onions are cured, it’s all about giving them a chill, comfy spot to hang out. Keep them somewhere cool, dry, and dark—think 35–50°F with medium humidity. Basements and unheated garages are basically onion Airbnbs. Use mesh bags or crates so they can breathe; plastic bags are the fast-pass to Rot Kingdom. And don’t let them bunk with potatoes—potatoes gas them out like annoying roommates.
Check your stash often and kick out any soft, sprouty troublemakers before they ruin the vibe. Sweet onions don’t last long—maybe a couple months—while strong storage types can chill for half a year or more.
Variety-Specific Timing Considerations
Different onion types have different “personalities.” Short-day onions grow fast but don’t store long. Long-day onions take their sweet time but stick around for months. Sweet varieties like Vidalia are meant to be eaten soon, while tough storage varieties like Copra or Stuttgarter are the winter warriors. Growing a mix gives you fresh flavor now and backup onions for the cold season.
- Read Also: A Gardener’s Handbook: Companion Plants for Onions
- Read Also: How to Grow Onion Bulbs: A Step-by-Step Guide for Harvests
Conclusion: Patience Pays Off
Growing onions is basically a lesson in chill. You’ve got to read the signs—floppy tops, soft necks, dry weather—and trust the process. Let them cure long enough and you’ll have onions that last for months, not days.
Each season teaches you something new, so jot down what worked and what flopped. Over time you’ll develop that weird gardener superpower where you just know when an onion is ready. And when you cut into a perfectly cured, homegrown bulb in the middle of winter, it feels ridiculously worth it.