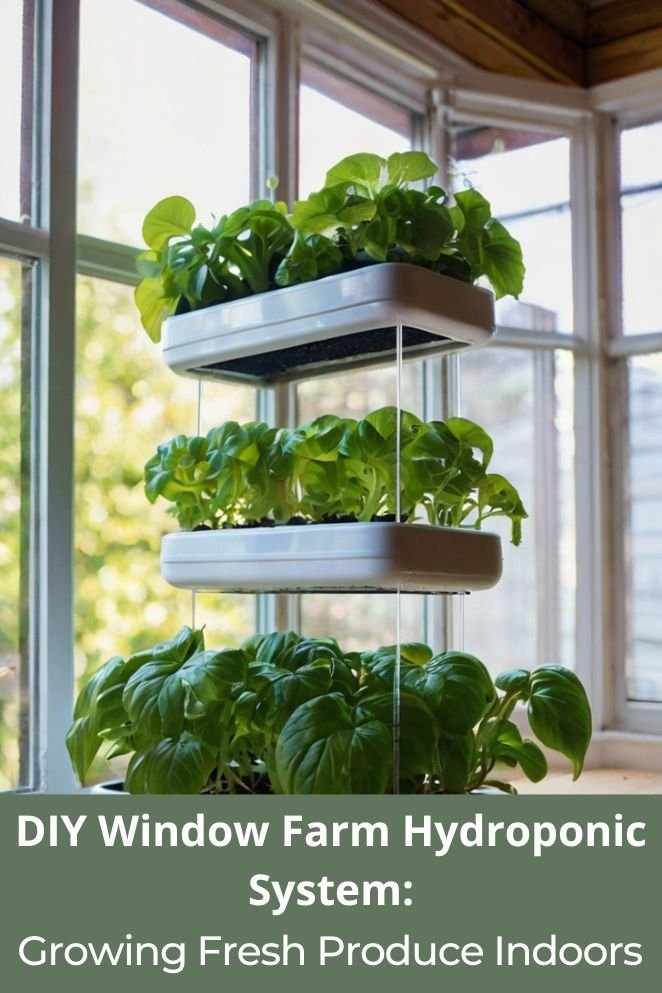
Imagine this: you walk to your kitchen window, grab some fresh lettuce, basil, and cherry tomatoes—straight from your own soil-free mini garden.
Sounds like sci-fi? Nope, it’s just a DIY hydroponic window farm.
Perfect for city folks, apartment dwellers, or anyone who’s ever killed a houseplant, window farming turns your sunniest window into a mini food factory.
No dirt, no pesticides, no backyard needed.
Just a clever setup and some sunlight—and boom, you’re basically the Iron Man of indoor gardening.
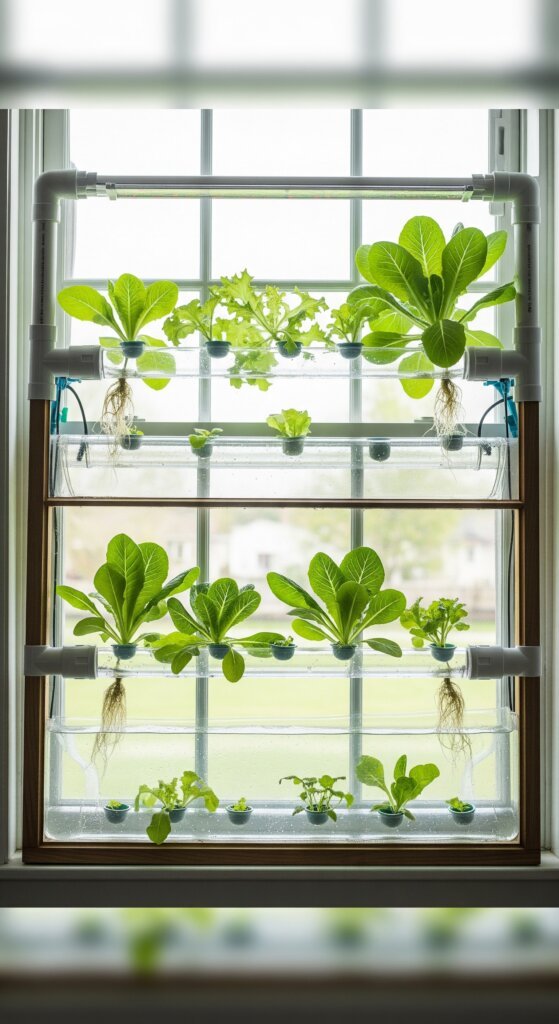
What is a Window Farm Hydroponic System?
Think of it as a vertical veggie tower for your window—no soil, just water with plant food.
A window farm is a stacked setup where plants grow in containers, and water with nutrients trickles down from the top like a garden waterfall.
It’s like the vertical version of The Sims’ gardening level-up.
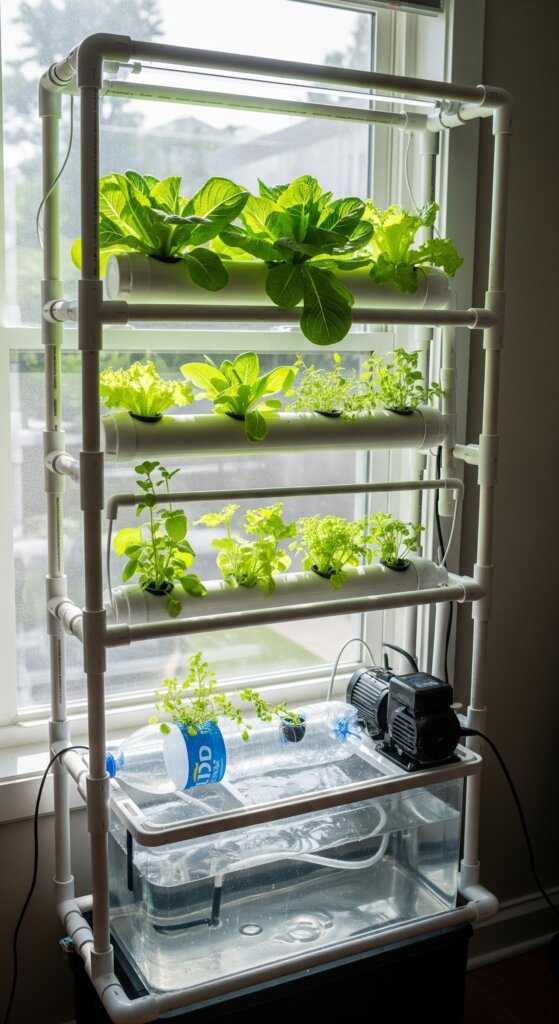
Key components
Water reservoir and pump
This is your system’s engine.
A small pump (usually one you’d use for a fish tank) moves the nutrient water up to the top so gravity can do its thing and let it drip down.
Easy, low-energy, kinda like your house cat.
Growing containers
Old water bottles, mason jars, or any container you can poke holes in will do.
These are where your plants hang out and grow. Bonus points for recycling.
Growing medium
No dirt here. We’re talking clay pebbles, coco coir, perlite—stuff that holds water and supports roots.
Like giving your plants a comfy beanbag chair instead of a mattress.
Nutrient solution
It’s Gatorade for plants. You mix water with hydroponic nutrients so your greens get everything they need without ever touching soil.
It’s plant fuel, straight up.
- Read also: The Beginner’s Guide: Build DIY Hydroponic Vegetable Garden
- Read also: Grow Fresh Herbs: Create Your Own DIY Hydroponic Herb Garden
Benefits of DIY Window Farm Systems
Because it’s like leveling up your kitchen window into a salad-producing machine. Here’s why it rules:
Space efficiency
Got a window? You’ve got a farm. Even a tiny 3-foot window can hold 20–30 plants stacked vertically.
Perfect for apartment dwellers, condo warriors, or anyone whose “yard” is just a balcony with Wi-Fi.
Year-round growing capability
No seasons? No problem.
With a window farm, you can grow fresh greens in January while your neighbor scrapes ice off their car.
Just keep the temp steady and add some grow lights if your window’s moody.
Water conservation and sustainability
Hydroponics is thirsty… but smart.
It recycles water instead of wasting it like a leaky faucet.
You’ll use up to 90% less than regular gardening. Mother Earth approves.
Faster growth and higher yields
No soil means no waiting around. Plants get their nutrients delivered straight to the roots, DoorDash-style.
That means faster growth and more harvests. Hello, endless basil pesto.
Pest and disease control
No dirt means way fewer pests and diseases. No aphids. No mold. No need to break out the chemical warfare.
Just clean, happy plants and even happier you.
Materials and Tools Needed
Essential materials
- 6-8 plastic bottles (2-liter soda bottles work perfectly)
- Aquarium pump (small, submersible pump rated for 50-100 gallons per hour)
- Food-grade plastic tubing (3/8 inch diameter, approximately 10 feet)
- Growing medium (perlite, coconut coir, or clay pebbles)
- Hydroponic nutrients (liquid or powder form)
- pH testing kit and pH adjustment solutions
- Air pump and air stones (for oxygenation)
- Reservoir container (5-gallon bucket or large plastic tub)
Tools required
- Drill with various bit sizes
- Hot knife or heated nail (for creating precise holes)
- Measuring tape
- Permanent markers
- Scissors or utility knife
- Funnel
- pH meter or test strips
Step-by-Step Construction Guide
Here’s the step-by-step guide to turning your window into a food-growing powerhouse.
No PhD required—just a drill, some bottles, and a little MacGyver energy.
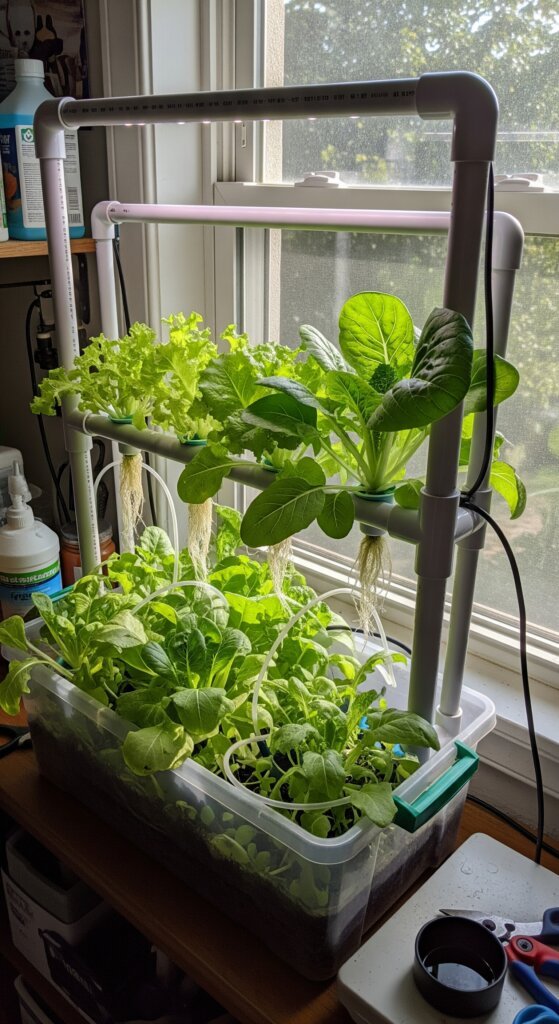
Step 1: Prepare your containers
Clean your bottles like you’re about to recycle them—but don’t. Peel off the labels.
Drill a hole near the bottom (about 1/4 inch) so water can drip from one to the next.
Now drill a second hole in the cap for your plastic tubing—this is how your pump sends water to the top.
Basically, it’s the plumbing of your plant skyscraper.
Step 2: Design your growing chambers
Cut a 2-inch hole on the side of each bottle, a couple inches from the bottom.
This is where your plant babies will live.
Sand the edges so they don’t slice your seedlings like a horror movie.
Step 3: Set up water circulation
Mount the bottles vertically (use wire, brackets, or whatever works).
Water will flow from the top bottle down like a tiny Niagara Falls for plants.
Hook your pump’s tubing to the top bottle. Make sure it’s tight—duct tape can help if you’re in a pinch.
Step 4: Install growing medium and plants
Fill each chamber with your growing medium (clay pebbles, coco coir, etc.).
If using seeds, plant like the package says.
Using seedlings? Rinse off the soil and tuck them in gently. No roughhousing.
Step 5: Prepare nutrient solution
Follow the label to mix hydroponic nutrients (1000–1500 ppm is the sweet spot for most herbs and veggies).
Use a pH tester—aim for 5.5 to 6.5. You’re basically brewing Gatorade for greens.
Step 6: Test and optimize
Run the system for 24 hours before adding plants.
Check that the water’s cycling right and not leaking everywhere.
Monitor pH daily and tweak it if needed.
Let water flow every 15–30 minutes like a chill sprinkler system.
Best Plants for Window Farm Systems
Not all plants are cut out for the vertical life.
Here’s the all-star lineup that actually thrives in a window farm—no soil, no drama.
Leafy greens and herbs
These guys grow fast, don’t take up much space, and basically water themselves if you set things up right:
- Lettuce (romaine, butterhead, leaf) – Grows like it’s in a race. Perfect for hydroponic newbies.
- Basil, cilantro, parsley, oregano – All the flavor without the grocery store markup. They love water and light—think of them as the Beyoncé of herbs.
- Spinach & kale – Packed with nutrients and super chill about growing indoors. Total overachievers.
Compact fruiting plants
They take a bit more effort, but the payoff? Cherry tomatoes while you’re still in your PJs.
- Cherry & grape tomatoes – Great in hydroponics but need some string or a mini trellis for support. Think Tom Holland as Spider-Man—small, energetic, needs a web.
- Peppers (jalapeños, sweet minis) – Totally doable in a window setup. Just give them some backup if they start getting top-heavy.
- Strawberries – Yes, you can grow these indoors. Just keep their roots cozy and give them love (and sunlight). Boom—dessert on demand.
Maintenance and Care
Building it was the easy part—now it’s time to actually keep your hydroponic jungle running.
Don’t worry, it’s not rocket science.
More like houseplant babysitting with a bit of science-y flair.
Daily monitoring
- Water check – Peek at your reservoir daily. Plants drink more when it’s hot, humid, or they’re going through a growth spurt (basically plant puberty).
- Plant vibes – Look for yellow leaves, sad stems, or anything funky. Catching issues early = less drama later.
Weekly tasks
- pH check – Test your water’s pH once a week. Keep it between 5.5–6.5 so your plants can actually eat the nutrients you’re giving them.
- Clean filters, unclog tubes – Gunk builds up. Give your pump a rinse and check for algae or blockages. Plants need that water flow like you need your morning coffee.
Monthly maintenance
- Swap the nutrient solution – Dump the old water and mix up a fresh batch of plant juice. This keeps salts from building up and avoids turning your system into a swamp.
- Full system check – Wipe down bottles, flush the tubes, scrub anything slimy. Replace busted parts. Basically, treat your window farm like a used car you actually care about.
Troubleshooting Common Issues
Even hydroponic systems have their drama.
But don’t panic—most issues are easy to handle if you catch ’em early.
Here’s your cheat sheet for saving the day (and your basil).
Algae growth
If your water starts looking like a swamp, algae’s crashing the party.
Too much light hitting your nutrient water is the culprit.
Fix: Wrap your reservoir and tubing in something dark—think Batman’s cape. No light = no algae.
Nutrient deficiencies
Leaves turning yellow? Growth slowing down? No fruit? Your plants are basically saying, “Feed me right.”
Fix: Check your nutrient mix and pH. Too weak or the wrong pH, and the roots can’t absorb what they need.
Aim for 5.5–6.5 and tweak your solution like a DJ fine-tuning a playlist.
Pump failures
When the pump goes silent, nothing flows. Bad news for thirsty roots.
Fix: Clean it monthly and check for gunk or wear. Always keep a backup pump around—it’s like carrying a spare phone charger, but for your lettuce.
Root rot
If roots get mushy and gross, you’ve got root rot. Usually from too much water and not enough oxygen.
Fix: Improve drainage, and if you want to go full mad scientist, toss in an air pump to bubble more oxygen into the mix. Your roots will breathe easy.
Advanced Tips for Optimization
Once your setup’s running smooth, it’s time to level up.
Here’s how to make your window farm smarter, faster, and way more productive.
Lighting considerations
Sunlight’s great—until it’s not. Cloudy days? Winter gloom? North-facing windows? Time to call in the reinforcements.
Fix: Add some LED grow lights. They’re like the plant version of a ring light—makes everything look and grow better. Set ‘em on a timer and let your plants bask like they’re on a beach in Bali.
Automation options
Tired of checking pH every other day? Want more sleep and less system babysitting?
Fix: Plug your pump into a timer and get an auto-pH monitor.
Set it, forget it, and let tech do the heavy lifting while you binge your favorite series guilt-free.
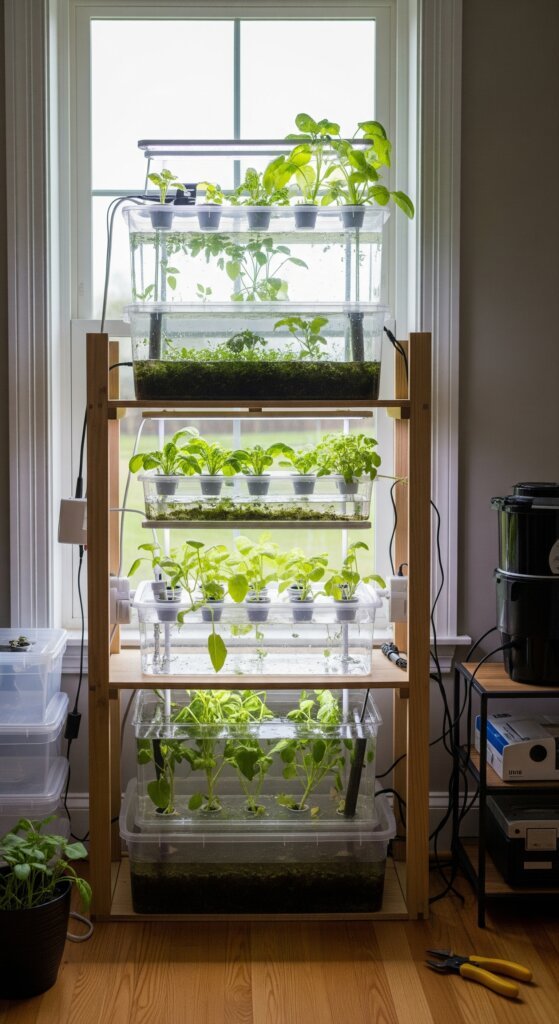
Expansion possibilities
Started small? Cool. But once you’re confident, go full Tony Stark.
Fix: Link up more window farms or build separate systems for different plant squads.
Lettuce on one, strawberries on another, maybe a pepper-only power tower. More farms = more food = more bragging rights.
- Read also: Step-by-Step Guide to Building a DIY Hydroponic Tomato System
- Read also: Kitchen Convenience: Create a DIY Window Herb Garden
Conclusion
So yeah—build a DIY window farm and boom, your sunny window turns into a year-round veggie vending machine.
It’s low-key maintenance, doesn’t hog space, and pays you back in salad and bragging rights.
You save cash, skip grocery trips, and grow your own herbs, greens, and mini fruits—all without soil or a backyard.
Start small, mess up a little, learn a lot. Then expand like Thanos collecting Infinity Stones (but, you know, with tomatoes).
With a bit of care, your setup will keep cranking out fresh, homegrown goodness for years.
Welcome to the hydroponic life. You’ve officially gone full plant nerd—and it’s awesome.


