Tired of wrestling hoses and still somehow killing your plants? Yeah, same struggle.
An underground watering system DIY is like giving your garden superpowers while you relax with a cold drink. It works quietly underground while you take all the credit.
Instead of wasteful sprinklers spraying water everywhere except the roots, underground drip systems send water exactly where plants need it. Less waste, lower bills, happier plants, better lawn.
This guide is your chill, know-it-all friend—showing you how to set it up, keep it running, and turn your garden into a total glow-up with zero stress.
What Is an Underground Irrigation System?
An underground irrigation system is essentially a hidden pipe system beneath your lawn, delivering the water directly to the roots of your plants—essentially giving them a direct pipeline to hydration heaven.
Rather than blasting around water like ordinary sprinklers do, these systems deliver it efficient, slow, and targeted. It’s similar to gulping from a firehose compared to sipping from a straw—your plants most certainly will prefer the straw.
There are two general types of subsurface irrigation systems:
Subsurface Drip Irrigation (SDI)
The drip lines are placed 6 to 12 inches below ground level, supplying water to the roots exactly where it is required.
It has low evaporation and keeps your plants happy, even during sweltering heat.
Micro-Irrigation Systems
They install teeny-tiny tubes with emitters close to the ground, ideal for gardens, raised beds, or even containers.
It’s like giving each plant its own personalized hydration plan—it’s so flexible.
- Read Also: Effortless Watering: Irrigation Systems For Vegetable Gardens
- Read Also: Herbs on Autopilot: DIY Drip Irrigation For Herb Garden
Key Benefits of Installing a DIY Underground Irrigation System
Water Conservation and Cost Savings
Inground irrigation systems are the water hack secret that they are—they can reduce your water consumption by as much as 90% over traditional sprinklers.
That’s equivalent to less cost and no shame in dry conditions. Because the water is delivered directly to the roots, there is virtually no evaporation waste or overflow.
Almost every drop is a saver—and your checking account will appreciate it.
Healthier Plants and Better Landscaping
Your plants will thank you. Regular watering at the base of the plants maintains them in good health, relaxed, and a lot less vulnerable to those pesky leaf ailments.
And because you’re not water the whole surface area, weeds can’t catch on. Less weeding, more relaxation.
Convenience and Aesthetic Appeal
No longer hoses strewn across the lawn or sprinklers wetting your feet at the barbeque.
It’s all underground, so your lawn is tidy and ready for guests. Your children, pets, and even guests can run around while the system operates quietly in the background.
Low Maintenance Requirements
Since the pipes are buried, they’re safe from lawnmowers and bad weather.
Once set up, these systems barely need attention—just a little seasonal checkup. It’s like autopilot for your garden.
Planning Your DIY Underground Irrigation System
Step 1: Assess Your Landscape
Before you buy anything, walk your yard like a detective. Look for:
- Garden layout – Mark every spot that needs water: lawn, veggie beds, flower patches, shrubs. Don’t forget the sneaky corners.
- Soil type – Clay holds water like a sponge; sandy soil drinks it fast. That changes how often and how long you water.
- Sun exposure – Full-sun spots thirst more than shady ones. Picture a sidewalk at noon vs. under a tree.
- Plant types – Group plants with similar needs together. It’s way easier than trying to keep a cactus and a fern happy with the same schedule.
- Water source – Figure out where the water’s coming from and plan where your main line will run so you’re not chasing hoses across the yard.
Step 2: Determine Water Requirements
Estimate how much water you’ll require based on type of plants, soil, and where you live. Fuzzy rule of thumb: most lawns/gardens require around 1 to 1.5 inches of water per week in growth season — but local conditions may vary.
One way to think of it is selecting the proper amount of gas for a car trip; not enough and you get stalled, too much and you’re wasting it.
Step 3: Design Your System Layout
Grab a piece of paper and sketch your yard. Mark plant spots, existing utilities, and the water source.
Draw where main and branch lines will run. This is your blueprint — it prevents mistakes, saves money, and makes installation way less chaotic.
Trust me: a bad sketch is like trying to build a fort without knowing where the doors are.
Materials and Tools You’ll Need
Essential Materials
- Main supply line – 3/4-inch or 1-inch flexible tubing to connect your water source
- Drip tubing – 1/2-inch or 5/8-inch tubing for main distribution lines
- Drip lines with emitters – Various flow rates (typically 0.5 to 2 gallons per hour) suited to different plants
- Fittings and connectors – T-joints, elbows, and couplers in appropriate sizes
- End caps and plugs – To close off line endings and prevent water waste
- Pressure regulator – Reduces water pressure to optimal levels (typically 20-30 PSI for drip systems)
- Filter – Prevents debris from clogging emitters
- Timer – Automates watering schedules for consistent irrigation
Helpful Tools
- Shovel or trenching tool
- Measuring tape
- Utility knife
- Pliers and wrench set
- Soil probe or auger
- Work gloves
Step-by-Step Installation Guide
Step 1: Mark Your Lines
Get some garden stakes or chalk and map out where your main and back-up water lines will go. It’s sort of making a treasure map for the garden.
Have them at least 12 inches away from big tree roots or walls—no attack of the roots later, please.
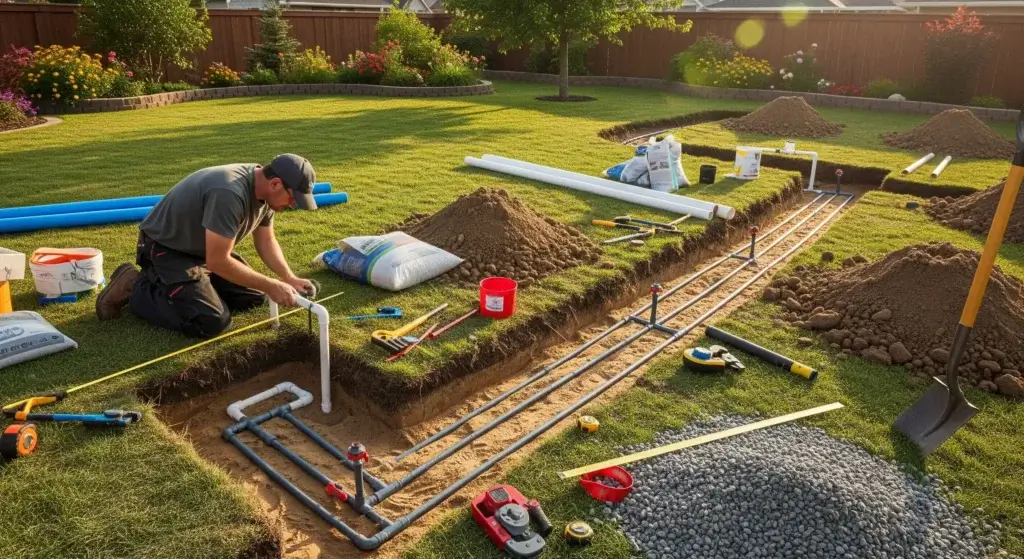
Step 2: Dig Your Trenches
Time to get your hands dirty! Dig trenches about 8 to 12 inches deep along your markings.
Keep the depth even so your water pressure stays consistent. Clear out rocks or sharp stuff—one little jagged stone can poke a hole and ruin your setup.
Step 3: Install the Main Supply Line
Hook your main line to your water source, attach a timer, and don’t forget a pressure regulator (trust me, skipping that can turn your garden into a water park).
Lay the main line in the trench and secure it with stakes if it wiggles around. Make sure it’s slightly deeper than your other lines—it’s the backbone of the system.
Step 4: Install Drip Lines and Distribution Lines
Next, split your main line like roots divide. The thin tubes deliver water directly to plants.
Bury drip lines with emitters close to root zones—around 4 to 6 inches deep in vegetable gardens and 6 to 12 inches in grass. That prevents water from evaporating on top but puts it exactly where plants require it.
Step 5: Test Your System
Don’t dig it in yet! Turn on the water and see how it runs. Check for leaks, odd pressure drops, or dry areas.
That’s your trial run—get any problems out of the way now before everything’s under cover.
Step 6: Cover and Backfill
When everything is up and functioning, begin placing cover on your trenches.
Gradually fill the trenches with soil very gently and tread it down so that you won’t disturb the tubing. Water it lightly to settle the soil in—like tucking your system into bed.
Step 7: Set Your Timer
Finally, set your irrigation timer. Early morning is the best (5–7 AM)—less evaporation, less disease, more efficiency.
It’s like it’s an alarm clock for your garden so the whole thing wakes up and starts the day on the right foot with a drink of water and a smile.
- Read Also: Save Water, Grow More! DIY Drip Irrigation for Raised Beds
- Read Also: The Ultimate Guide to DIY Drip Irrigation for Houseplants
Maintenance Tips for Long-Term Success
To keep your underground irrigation system running smoothly for years:
- Check filters regularly – Clean or replace filters monthly during growing season to prevent emitter clogging
- Inspect for leaks – Periodically check soil moisture patterns for dry spots indicating leaks or damaged lines
- Flush the system – At season’s end, run water through all lines to remove accumulated debris
- Adjust for seasonal changes – Increase watering frequency during hot, dry periods; reduce during cool or rainy seasons
- Winterize properly – In cold climates, drain your system before freezing temperatures arrive to prevent pipe damage
Common Mistakes to Avoid
Don’t let these pitfalls compromise your system’s performance:
- Insufficient pressure regulation – Unregulated pressure causes emitter damage and inconsistent water distribution
- Poor trench depth consistency – Varying depths lead to pressure fluctuations and dry spots
- Inadequate filtering – Debris clogs emitters, creating expensive maintenance problems
- Overwatering – More water isn’t better; follow manufacturer guidelines for run times
- Ignoring local utilities – Always call before digging to locate underground electric, gas, and water lines
Conclusion
Building a DIY underground irrigation system is totally doable and worth it — think major water savings, healthier plants, and less yard drama.
The install takes planning and elbow grease, but afterward you’ll spend way less time watering and more time chilling.
Whether it’s a tiny veggie patch or the whole lawn, underground drip irrigation is a smart, lowkey genius move for sustainable landscaping. Start by mapping your yard, get good materials, follow the steps, and your plants — and your water bill — will glow up.


