Growing strawberries gets stupidly simple and space-smart with a DIY tower made from basic 5-gallon buckets.
If you’ve got a tiny balcony, a small patio, or zero garden space, stacking buckets turns vertical real estate into a strawberry setup anyone can manage — think big payoff, little footprint.
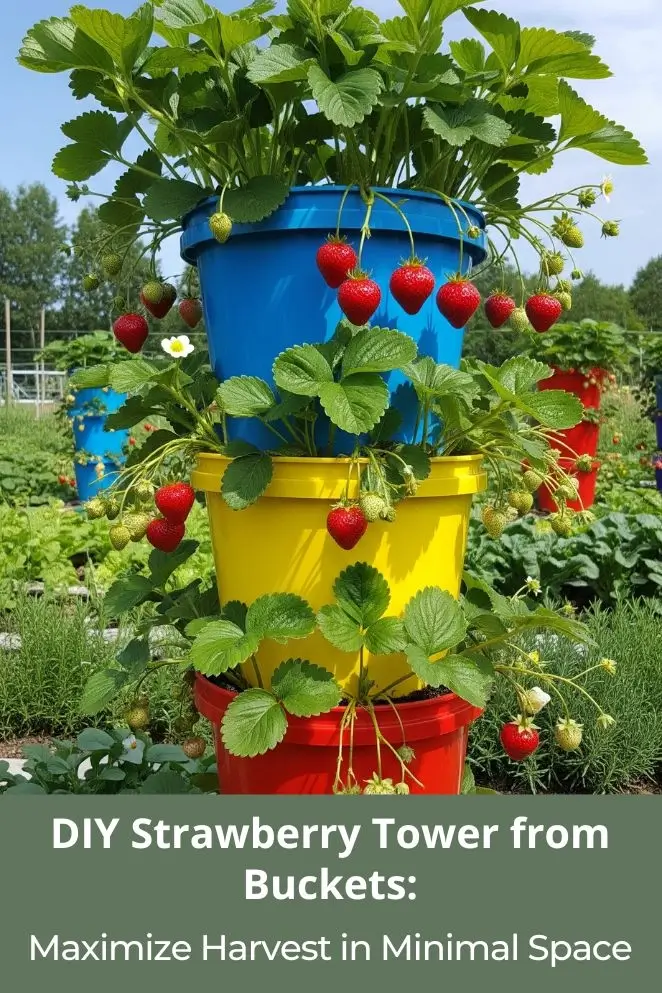
Picture a neat column of buckets dripping with red berries instead of wasted railing space.
Urban gardening is booming for a reason: it’s clever and actually works.
This vertical planter can squeeze in 48 plants in about 2 square feet — wild, right? Start with good soil and drainage, and you’ll be pulling fresh berries sooner than you expect — bragging rights included.
Why Choose a Strawberry Tower System?
Space-Saving Benefits
A strawberry tower is like stacking nature’s candy vertically instead of wasting floor space.
You can grow way more berries—like 2–3 times more—without needing a giant garden. Perfect if you’re stuck with just a balcony, a patio, or basically a shoebox backyard.
Improved Plant Health and Productivity
When plants aren’t crammed together, they breathe better.
That means fewer nasty diseases and pests trying to ruin your berry dreams.
Plus, the berries stay clean and off the ground, so no surprise slug snacks when you go to pick one.
Easy Maintenance and Harvesting
Forget bending over till your back hurts. With towers, you just water smart, skip weeding altogether, and pluck berries at eye level.
It’s like the difference between hunting for Wi-Fi in the basement versus just having full bars on your phone. Easy wins.
Materials and Tools You’ll Need
Essential Materials
Here’s your starter pack for building a strawberry tower, no complicated shopping list required:
- Two or three 5-gallon buckets (bonus points if they’re food-grade — basically safe for stuff you eat)
- A roll of landscape fabric or even straw to keep things lined and tidy
- Around 3–4 cubic feet of solid, high-quality potting soil (don’t cheap out, your berries deserve the good stuff)
- A 4-foot piece of PVC pipe (about 4 inches wide) to act as your irrigation system — think of it like the tower’s water straw
- 12–18 strawberry plants, depending on how tall you want to go
- Small gravel or perlite so water drains instead of drowning your plants
Required Tools
This is the “DIY toolbox” moment:
- Drill with different bit sizes (you’ll feel like a pro once you start making holes)
- A 1 ¾ inch hole saw — some folks go bigger, like 2 inches, if they want chunkier planting holes
- Measuring tape (yes, accuracy matters here)
- A marker or pencil for sketching where to cut
- A sharp knife or box cutter — treat it like the Excalibur of this project
- A level (not essential, but handy if you don’t want a leaning Tower of Strawberries)
Choosing the Right Strawberry Varieties
Not every strawberry is built for tower life.
You want the overachievers — the ones that pump out berries all season instead of quitting halfway through.
Day-neutral and everbearing strawberries are your best bet because they don’t care what time it is; they just keep fruiting.
Popular choices:
- Albion: day-neutral, crazy good flavor
- Seascape: day-neutral, tough against diseases
- Ozark Beauty: everbearing and can handle the cold like a champ
- Quinault: everbearing with extra-large berries (yes, the ones that make your friends jealous)
Step-by-Step Construction Guide
Step 1: Prepare Your Buckets
First things first — clean those buckets like your strawberry future depends on it.
No old paint, no mystery gunk.
If you’re recycling buckets, make sure they once held food-safe stuff (not motor oil, unless you want mutant berries).
Use a marker to plot your planting holes, spacing them about 6–8 inches apart so your plants don’t end up fighting like siblings in the backseat of a car.
Step 2: Create Planting Holes
Grab your hole saw and start drilling — this is where you get to feel like a garden engineer.
On the bottom bucket, start your holes about 6 inches from the base, then go all around.
For the buckets stacked above, go wild and drill holes throughout the height.
Around 6–8 holes per bucket works great, depending on how berry-obsessed you are.
Step 3: Install the Irrigation System
Here’s the genius part: the PVC pipe becomes your tower’s water straw.
Drill a bunch of tiny holes (about 1/8 inch) along its length, then slide it straight down the middle of your stacked buckets.
It should peek a little above the top bucket so you can easily water from the top and watch it hydrate the whole tower like magic.
Step 4: Create Proper Drainage
Dump a 2-inch layer of gravel or perlite into the bottom bucket.
This keeps water moving instead of drowning your plants in a soggy grave.
Double-check the drainage holes at the bottom are clear, because strawberries love water but hate wet feet.
Step 5: Line and Fill Your Tower
Here’s a pro tip: lining your buckets with straw makes watering way smoother — the soil stays moist without turning swampy.
Landscape fabric works too.
Once lined, fill each bucket with rich potting soil, making sure your PVC pipe stays upright in the middle like the tower’s spine.
Step 6: Plant Your Strawberries
Now the fun part: planting. Start at the top and carefully slide strawberry plants into each hole.
Keep the crown (that’s the little growth point where leaves sprout) right at soil level — too deep and it rots, too shallow and the roots dry out.
Gently pack soil around each plant, like tucking them into bed.
Step 7: Initial Watering and Setup
Pour water straight into the PVC pipe and let it work its way down — it’s like hitting the hydration jackpot for every plant at once.
Then park your tower somewhere sunny, at least 6–8 hours of direct light a day.
Stick a tray or saucer under the bottom to catch drips, unless you like surprise puddles on your patio.
Maintenance and Care Tips
Watering Requirements
Your tower’s thirsty, but don’t drown it.
Water through the central PVC pipe 2–3 times a week, and crank it up when it’s blazing hot outside.
The tower design does a solid job of sharing water with every level, but still stick a finger in the soil here and there to make sure the top and bottom aren’t living totally different lives.
Dry plants = sad berries.
Fertilizing Your Tower
Since your plants are basically trapped in a bucket condo, they can’t go scavenging for food like wild strawberries.
That means you are their personal chef.
Feed them a balanced, water-soluble fertilizer every 2–3 weeks during the season.
If you’re into organic vibes, fish emulsion or compost tea works like magic.
Seasonal Care
Winter can be brutal for strawberries if you’re in a cold place.
Wrap the tower in burlap like a cozy blanket, or drag it somewhere sheltered.
If you’re lucky enough to live where it’s warm year-round, congrats — your tower could keep giving you berries nonstop.
Just snip off runners (those baby plant tentacles) so the energy goes into fruit instead of growing strawberry spaghetti.
Pest and Disease Management
Here’s the good news: pests hate climbing.
Towers naturally dodge a lot of the bugs and diseases that attack ground-level plants.
Still, keep an eye out for freeloaders like aphids and spider mites, and watch for fungus trying to sneak in.
Thanks to better airflow, towers already cut down the risk, but regular checkups mean you’ll catch problems before they wreck your berry empire.
Troubleshooting Common Issues
Uneven Growth Between Levels
If the plants on the top are living their best life while the ones near the bottom look like they need therapy, it’s usually a water or food issue.
Double-check that the holes in your irrigation pipe aren’t clogged, and tweak your watering routine so every floor of the “strawberry apartment” gets its fair share.
Nobody likes being the neglected basement kid.
Soil Settling and Compaction
Over time, the soil in your tower sinks down like a beanbag chair after too many Netflix marathons. Totally normal.
Just sprinkle in some fresh potting mix or compost on top to fluff things back up and keep nutrients flowing.
Think of it as topping off a milkshake — the strawberries will thank you.
Temperature Fluctuations
Strawberries in buckets are drama queens when it comes to weather.
Too hot? They’ll sulk. Too cold? They’ll freak out.
If it’s scorching, give them some afternoon shade or water more often so they don’t roast.
If it’s freezing, wrap your tower in frost cloth or move it somewhere cozy, like tucking it in for the night.
Maximizing Your Harvest
Succession Planting
Want strawberries all season instead of one giant sugar rush and then nada? Build a couple towers and plant them a few weeks apart.
It’s like setting up a strawberry conveyor belt — one tower hits peak production, and by the time it chills out, the next one kicks in.
Boom, endless berries.
Companion Planting
Strawberries don’t mind roommates, especially the cool herb types.
Sneak in some thyme or oregano in a few holes, and they’ll act like tiny bodyguards keeping pests away.
Plus, bonus herbs for your pizza or pasta night — double win.
Harvest Timing
The golden rule: don’t pick green or half-baked berries. Wait until they’re fully red but still firm, then snag them.
If you keep picking every few days, the plants get the memo and keep cranking out more fruit.
Pro tip? Morning harvests taste the sweetest — it’s like the berries are extra chill before the sun hits.
Conclusion
Building a DIY strawberry tower is cheap, easy, and seriously effective — no giant garden needed.
Strawberries thrive in this setup, and with a little care, your tower will crank out berries for years while looking pretty cool on your balcony or patio.
The magic combo here? Space-saving, healthier plants, way less work, and more fruit than you’d get from a boring planter box.
Whether you’re just starting out or already flexing gardening skills, a strawberry tower is the perfect project.
Get one going, and soon you’ll be munching on fresh berries you grew yourself — proof that even a couple buckets stacked together can become a berry factory.


