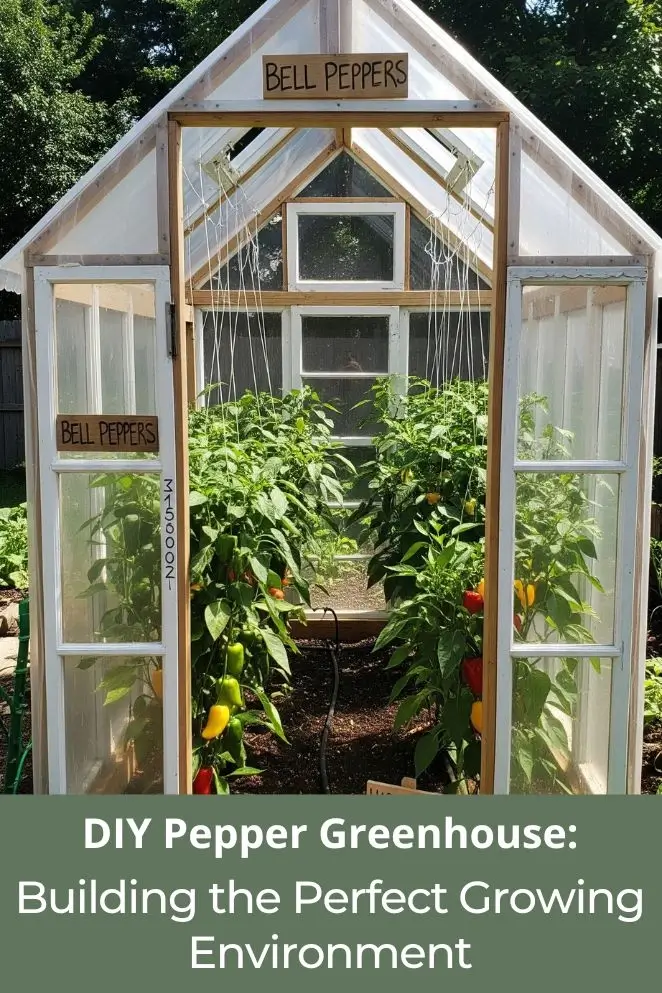
Growing peppers all year is totally doable now. With a simple DIY pepper greenhouse, you can keep your plants safe, stretch out the season, and always have fresh peppers on hand.
I built mine with scrap wood and plastic, and trust me—it wasn’t fancy, but it worked like magic.
Whether you’re new to gardening or already obsessed, setting one up is way easier (and cheaper) than you think.
Understanding Pepper Growing Requirements
To ensure happiness, peppers must learn their true purpose before hammering nails and wiping plastic sheets.
This is especially important for us in the south.
Temperature Requirements
Peppers are heat-lovers. They thrive when it’s around 70–85°F (21–29°C) during the day and a cozy 60–70°F (15–21°C) at night.
Too cold, and they just sit there looking sad. Too hot, and they drop their flowers like drama queens.
The beauty of a greenhouse? You’re basically in charge of the thermostat. No more stressing about random cold snaps messing with your plants.
Humidity and Ventilation
These guys also like their air just right—humid but not swampy.
Around 65–85% humidity is their sweet spot.
So, when you build your greenhouse, make sure it can “breathe.” Fans, vents, windows—anything to keep the air moving so the plants stay healthy.
Light Requirements
Peppers are sun-chasers. They need at least 6–8 hours of direct sunlight every single day.
If you plop your greenhouse in the shade, don’t expect much.
Think about the location where the sun shines and your peppers can enjoy the view from above like they are basking on a golden sand.
This is how you define an ideal place for outdoor exercise. A little bit of extra spice can result in a higher pepper consumption.
Planning Your DIY Pepper Greenhouse
Before you start building, you’ve gotta plan it out—otherwise, you’ll end up with a crooked shack that barely holds together (been there, done that).
Think about your space, your budget, the weather where you live, and even the type of peppers you’re dreaming about growing.
Size Considerations
For most home growers, a greenhouse somewhere between 8×10 feet and 12×16 feet hits the sweet spot.
Big enough so your peppers aren’t crammed like sardines, but still small enough that you can actually build it without losing your mind.
Materials usually run about $25 per square foot, so size isn’t just about space—it’s about how much cash you’re willing to drop.
Location Selection
Sun is king. Put your greenhouse where it gets the most light—southern exposure is gold.
Make sure the ground drains well so you don’t end up with pepper plants standing in mud.
And don’t forget wind! One good storm can turn a poorly placed greenhouse into a kite.
Building Codes and Permits
Yeah, this part feels boring, but trust me—you don’t want your hard work torn down because you skipped the rules.
Call your local zoning office and see what’s up. Permits usually run anywhere from $100 to $600.
It’s way better to handle it upfront than get slapped with a fine or told to rip your greenhouse down later.
Essential Materials for Your DIY Pepper Greenhouse
The stuff you build your greenhouse with can make or break it.
Cheap out in the wrong spot, and you’ll be chasing plastic sheets across the yard after the first storm.
Pick smart, and your peppers will be chilling in a cozy fortress for years.
Frame Materials
- Aluminum: Light, doesn’t rust, and barely needs any babysitting. Think of it as the “set it and forget it” option. Great for long-term builds.
- Steel: Stronger than aluminum—like the gym bro of frames. But it’s heavier and needs protection from rust. Perfect if you’re building something bigger and sturdier.
- Wood: Classic look and smells amazing when you’re building it. But it’s high-maintenance.
- PVC: Super cheap and easy to work with. Awesome for your first try, but don’t expect it to last forever.
Covering Materials
- Polycarbonate Panels: These are the all-stars. They insulate well, block harmful UV, and let in just the right amount of light. Plus, they’re tough enough to handle storms.
- Glass: Although glass appears sophisticated and lets in a lot of light, it’s pricey and heavy, and requires hefty support to hold it.
- Polyethylene Film: Dirt cheap and great for beginners. Not super durable, but it’s easy to replace. Perfect if you just want to test things out without dropping a ton of cash.
Foundation Options
A good foundation keeps your greenhouse from wobbling like a wobbly chair.
You can go full pro with a concrete slab, keep it simple with a gravel base, or do treated lumber to balance cost and stability.
Honestly, gravel with treated wood borders is the sweet spot—solid, affordable, and doesn’t make you curse while building it.
Step-by-Step Construction Guide
Building your pepper greenhouse isn’t rocket science, but you do need to follow the steps in the right order—otherwise, you’ll end up with a lopsided hut that leaks like crazy.
Think of it like building a giant Lego set, but the reward is fresh peppers year-round.
Foundation Preparation
Start by marking out where your greenhouse will sit.
Dig down about 4–6 inches, then toss in a gravel base so water doesn’t pool under your plants.
After that, build a frame with treated lumber. Double-check that it’s level and square.
Frame Assembly
Now it’s time to raise the skeleton. Build the base first, then work your way up.
Corners are your weak spots, so make those extra solid.
If you’re using metal, grab the right fasteners and think about adding expansion joints—metal expands and shrinks with temperature changes, and you don’t want your greenhouse groaning like an old ship.
Installing the Covering
Time to wrap it up! Start attaching your panels or film from the bottom and work upward so rain slides off instead of sneaking inside.
Seal the joints tight—you don’t want your greenhouse turning into a drafty tent.
Polycarbonate panels are a bit fussy, so follow the instructions for leaving little gaps for expansion.
Ventilation Installation
Peppers hate stuffy air. Put in roof and side vents to keep things moving.
If you want to geek out, peppers are happiest at a VPD (vapor pressure deficit) of 0.5–1.0 kPa, which basically means “not too wet, not too dry.”
Automatic vent openers are a game-changer—they open up when it gets hot, so you don’t have to babysit your plants every hour.
Interior Setup
Now for the fun part—setting up the inside. Add shelves, benches, or whatever layout fits your pepper army.
Leave enough space for paths so you’re not tripping over pots.
Pop in a thermometer and a humidity gauge too—they’re like your dashboard for greenhouse life.
Once it’s all set, you’ll step inside and feel like you’ve built your own pepper kingdom.
Optimizing Your Pepper Greenhouse for Maximum Yield
So, you’ve built your greenhouse—congrats! Now comes the real game: getting those peppers to pump out as many fruits as possible.
It’s not just about planting and hoping for the best; you’ve gotta fine-tune their little environment like a DJ mixing tracks.
Climate Control Systems
If you live somewhere cold, toss in a heater with a thermostat so your peppers don’t freeze their leaves off.
Hot climate? Fans and shade cloths are your best friends—nobody likes peppers that get sunburned.
If you really want to go pro, you can set up automated climate control that adjusts temp and humidity for you.
That’s like having a smart home, but for plants.
Growing Medium Selection
Where you grow your peppers matters big time.
You can go old-school with soil beds, keep it neat with raised beds, pop them in containers, or geek out with hydroponics (that’s basically growing in water with nutrients). Each one has perks.
Irrigation Systems
Watering peppers isn’t about dumping a bucket and walking away.
They need steady moisture, not “flood one day, desert the next.”
Drip irrigation is clutch in greenhouses—it dribbles water right where the roots need it and keeps humidity from spiking all over the place.
Bonus: it saves water, so you’re not wasting buckets on soggy soil.
Common Challenges and Solutions
Even the best greenhouse setup isn’t drama-free.
Peppers are tough, but they’ve got their weak spots.
If you know what might go wrong, you can stop problems before they blow up and ruin your harvest.
Pest Management
Greenhouses are basically five-star hotels for bugs like aphids, whiteflies, and spider mites.
Left alone, they’ll multiply like it’s spring break.
Fight back with an army of good bugs (ladybugs are MVPs), sticky traps, and organic sprays if things get messy.
Disease Prevention
Disease factories thrive in crowded greenhouses.
Inhalation at the air, dispose of dead shoots, and let your peppers breathe.
Fertile infections and bacterial spots prefer dirty, moist areas.
Take a walk around your greenhouse frequently, engage in plant detective activities, and remove any sketchiness before it spreads.
Temperature Fluctuations
The mood swings in weather are not a favorite of peppers.
A hot rollercoaster ride will result in them ejaculating, experiencing flower loss, and an abrupt cessation of production.
Keep things steady by placing water barrels inside to absorb heat during the day and release it at night, similar to the effectiveness of a natural heater.
Seasonal Management Tips
Growing peppers isn’t just “set it and forget it”—you’ve gotta play the long game and tweak your care depending on the season.
Think of it like a year-round training schedule for your plants.
Spring Preparation
Kick things off by starting seeds indoors about 8–10 weeks before your last frost.
Peppers are divas about cold, so don’t toss them outside too soon.
Slowly get them used to greenhouse life—kind of like easing into a cold pool instead of cannonballing.
Meanwhile, get your beds or containers prepped so they’ve got a comfy place to move into.
Summer Maintenance
If you’re in a cold area, don’t give your peppers the boot just yet.
You can winterize them by limiting water and maintaining temperatures no less than 50°F.
They’ll survive it, take it easy, and be primed to come back stronger in the spring.
Winter is otherwise an excellent time to plan—acquire new seeds, lay out crop rotation, and fantasize about next year’s pepper kingdom.
Fall Harvesting
As the temps outside drop, your greenhouse becomes the ultimate cheat code. Keep things warm enough inside, and your peppers will keep producing when everyone else’s plants are dying off. Before the first frost hits, snag any leftover peppers unless you’ve got the heat to keep them going. It feels like stealing extra weeks of summer.
Winter Planning
If you’re in a cold spot, don’t write off your peppers.
They can be overwintered by reducing watering and maintaining temperatures at or below 50°F.
They’ll survive, wait it out, and be ready to recover more rapidly come springtime.
Winter is prime planning time—order new seed, plan crop rotation, and fantasize about next year’s pepper kingdom.
Conclusion
Building your own pepper greenhouse is one of the smartest moves if you want more peppers for longer.
With some planning, decent materials, and a bit of effort, you can make a setup that lasts for years—without dropping cash on some overpriced store-bought kit.
The real secret? Know what peppers need and design your greenhouse around that.
Every season you’ll learn something new, tweak your setup, and watch your plants get better.


