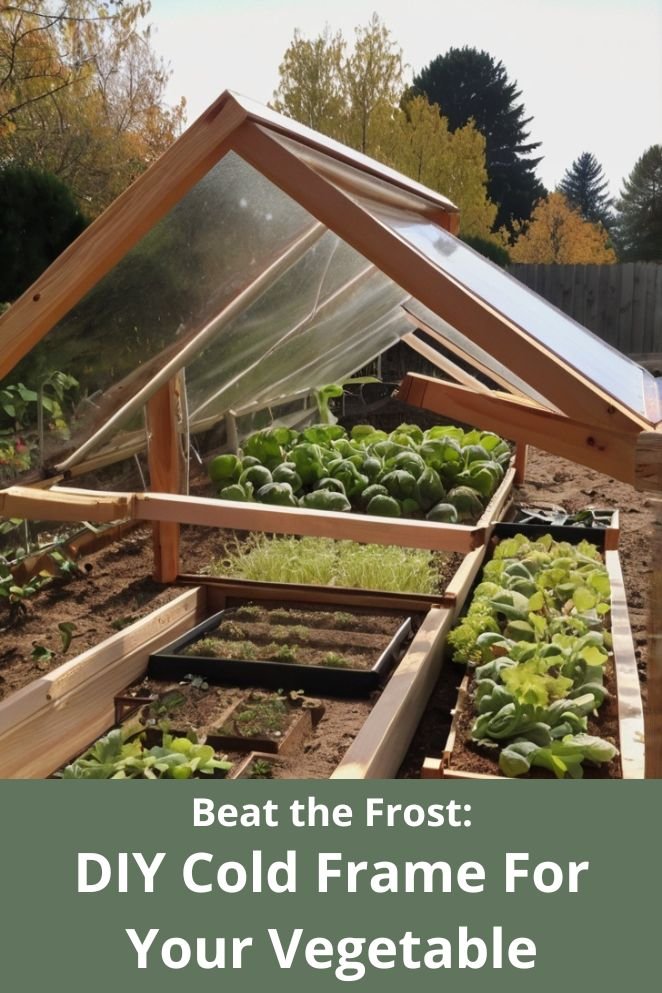
As a gardener, you understand the importance of maximizing your harvest by prolonging the growing season and shielding your plants from adverse weather.
Building your own cold frame can be an effective solution, allowing you to extend the growing season and protect your seedlings from harsh conditions.
In this article, we’ll provide you with step-by-step instructions on how to construct and utilize a cold frame for your vegetable garden.
Benefits of a DIY Cold Frame
Let’s explore the benefits of constructing your own cold frame for your vegetable garden:
Extend your growing season
A DIY cold frame is a game-changer for gardeners looking to maximize their harvests.
By providing a protective environment, it allows you to cultivate vegetables even during the coldest months of the year.
With the extended growing season, you’ll enjoy a bountiful harvest for a longer period, increasing your overall yield and variety of produce.
- Read also: DIY Vegetable Garden Box: Build Your Own Veggie Oasis
- Read also: Balcony to Farm Fresh: DIY Vegetable Garden on a Balcony
Protect seedlings
One of the primary advantages of a cold frame is its ability to shield delicate seedlings from harsh weather conditions.
Frost, wind, and extreme temperatures can wreak havoc on young plants, stunting their growth or even causing them to perish.
A cold frame acts as a barrier, creating a microclimate that offers insulation and protection.
This ensures that your seedlings remain safe and healthy, allowing them to establish strong roots and flourish into robust plants.
Boost germination rates
Consistency is key when it comes to seed germination, and a cold frame provides the ideal environment for success.
By regulating temperature and humidity levels, it creates optimal conditions for seeds to sprout and thrive.
The controlled environment inside the cold frame encourages quicker and more uniform germination rates, giving your garden a head start on the growing season.
Cost-effective and customizable
Building your own cold frame is not only budget-friendly but also offers the flexibility to tailor the design to suit your garden’s specific requirements.
You can repurpose materials or use readily available supplies to construct a customized cold frame that fits seamlessly into your garden layout.
Whether you have limited space or unique gardening needs, a DIY cold frame offers a cost-effective solution that can be adapted to meet your preferences and space constraints.
Planning Your Cold Frame
Location is key
Selecting the right location for your cold frame is crucial for its success.
Opt for an area that receives ample sunlight throughout the day and has good drainage to prevent waterlogging.
Ideally, position the cold frame facing south to capture the maximum amount of sunlight, ensuring optimal conditions for plant growth and warmth during cooler months.
Sizing up your needs
Before constructing your cold frame, assess your gardening goals and available space to determine the appropriate size.
Consider the types of vegetables you plan to grow and their mature size, as well as the need for adequate air circulation within the frame.
By understanding your specific requirements, you can design a cold frame that accommodates your plants while maximizing efficiency and productivity.
Material options
- Wood: Wood is a classic choice for cold frames, offering a sturdy and attractive design. Consider using cedar or treated lumber for longevity.
- Recycled materials: Upcycle old windows, doors, or bricks to create an eco-friendly cold frame. This option is not only cost-effective but also environmentally friendly.
- Plastic sheeting or corrugated plastic panels: Clear plastic sheeting or corrugated plastic panels are affordable and easy to use. They provide excellent insulation and allow for maximum sunlight exposure.

Building Your Cold Frame (Step-by-Step Guide)
Let’s walk through the process of building your cold frame with a step-by-step guide:
Step 1: Gather your supplies
Before you begin construction, gather all the necessary supplies and tools. You’ll need:
- Saw
- Drill
- Screws
- Wood or recycled materials (such as old windows or doors)
- Plastic sheeting or corrugated plastic panels
- Hinges and staples (if using a lid)
Step 2: Constructing the frame
Base construction
Assemble the wooden frame or repurpose recycled materials to create the base of your cold frame.
Cut the wood to the desired dimensions using a saw, ensuring that the frame is sturdy and well-constructed.
If using recycled materials, clean and prepare them accordingly before assembly.
Leveling the frame
Use a level to ensure that the frame is level and secure on the ground.
This step is crucial for stability and proper drainage within the cold frame.
Step 3: Attaching the lid
Securing the transparent material
Depending on your chosen material (plastic sheeting or corrugated plastic panels), secure it to the frame using staples, hinges, or other appropriate methods.
If using hinges, attach them to one side of the frame and the transparent material to create a lid that can be opened and closed for ventilation.
Ensuring security and ventilation
Ensure that the lid is securely attached to the frame and can be easily opened and closed as needed.
Proper ventilation is essential to regulate temperature and humidity levels within the cold frame, promoting healthy plant growth.
Step 4: Planting and maintaining your cold frame
Once your cold frame is constructed, it’s time to plant your vegetables and begin caring for your garden.
Monitor temperature and humidity levels regularly, adjusting ventilation as needed to maintain optimal growing conditions.
Water your plants as necessary and protect them from pests and diseases to ensure a successful harvest.
Preparing the Soil
Preparing the soil is a crucial step in ensuring the success of your cold frame garden. Here’s how to do it:
Choosing the right soil
Select a well-draining potting mix specifically formulated for seedlings or young vegetables.
Avoid using regular garden soil, as it tends to compact over time, hindering proper drainage and root growth.
A high-quality potting mix provides the ideal balance of nutrients, moisture retention, and aeration for healthy plant development.
Planting tips
When planting in your cold frame, you have the option to sow seeds directly into the soil or transplant seedlings from indoors.
If sowing seeds, follow the recommended planting depth and spacing for each type of vegetable.
Ensure that there is enough space between plants to allow for proper air circulation and prevent overcrowding, which can lead to disease and stunted growth.
Ventilation and temperature control
Proper ventilation is essential for maintaining optimal growing conditions inside the cold frame.
On warm days, open the lid to allow fresh air to circulate and prevent overheating. This helps regulate the temperature and humidity levels, creating a favorable environment for plant growth.
Additionally, it’s important to monitor the internal temperature of the cold frame regularly.
You can do this by using a thermometer placed inside the frame.
Adjust the lid accordingly to control the temperature, ensuring that it stays within the optimal range for your plants.
- Read also: Grow Anywhere: DIY Container Ideas For Vegetables
- Read also: DIY Plant Covers for Winter: Protect Your Greenery
Conclusion
Constructing your own DIY cold frame presents an accessible and budget-friendly solution to prolonging your growing season and enhancing your harvest.
By adhering to the steps and insights provided here, you’ll be able to craft a practical and efficient cold frame, enabling you to enjoy abundant yields throughout the year.
FAQs
Cold frames provide protection from harsh weather conditions, extend the growing season, boost germination rates, and are cost-effective and customizable.
You can use wood, recycled materials, plastic sheeting, or corrugated plastic panels to build a cold frame.
Maintain your cold frame by opening the lid for ventilation on warm days, controlling the internal temperature, and ensuring proper drainage and air circulation.
Yes, cold frames can be used for a variety of vegetables, including leafy greens, root vegetables, and brassicas.
Determine the appropriate size based on the mature size of the plants and the available space. Consider the space needed for air circulation and proper growth.


