Winter doesn’t have to nuke your access to fresh greens. A DIY indoor grow shelf lets you grow lettuce, spinach, kale, and herbs all winter—no backyard, no snow boots, no drama.
I’ve done this in a random corner of my house, and watching baby greens grow while it’s freezing outside feels like a tiny act of rebellion. This guide shows you how to build a cheap, efficient setup that turns your room into a mini food factory.
Why Build an Indoor Grow Shelf?
Here’s the deal: store-bought greens are tired. They’ve been shipped, stored, and basically had a long, boring life before you eat them. Studies show homegrown greens can have way more nutrients, and honestly, they just taste better.
Indoor growing means no pesticides, less waste, and something cool to do when winter makes everything feel dull. Plus, growing your own food hits different—it’s part science experiment, part flex.
Key advantages of DIY indoor grow shelves include:
- Year-round access to fresh greens, even when it’s cold and miserable outside
- Way cheaper than buying fancy pre-built grow systems
- Total control over light, water, and what you actually want to grow
- A hands-on way to learn science without a textbook
- Plants that help clean the air and make your room feel alive
- Lower grocery bills and fewer boring store runs
The National Gardening Association says home gardens can produce hundreds of dollars’ worth of food a year. Even a small indoor grow shelf can crank out $200–300 worth of greens over winter—which is wild when you realize it’s happening right next to your desk.
Planning Your Indoor Grow Shelf
Before gathering materials, consider your available space and growing goals.
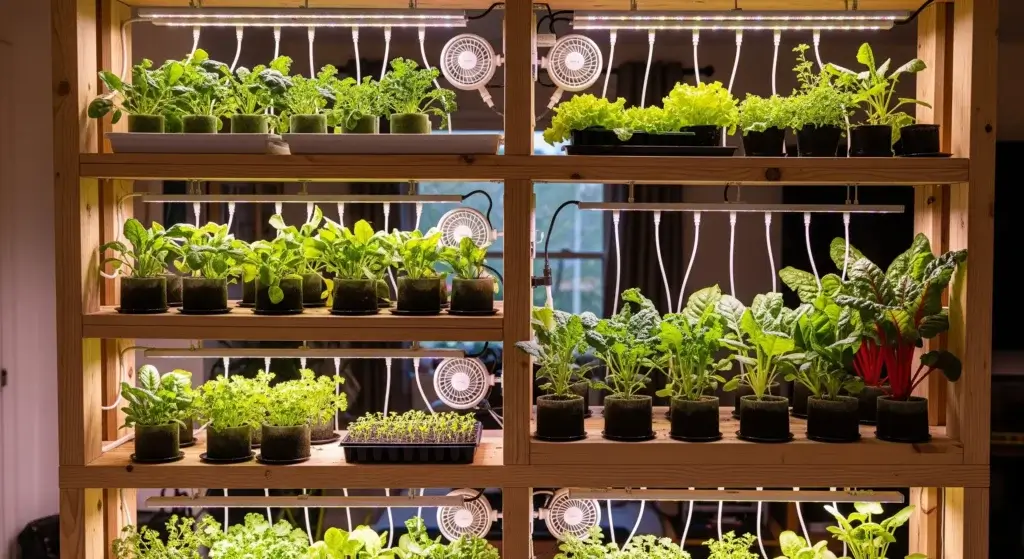
A typical grow shelf measures 4 feet wide by 2 feet deep by 6 feet tall, accommodating three to four growing levels. However, you can easily scale this design up or down based on your needs.
Essential planning considerations:
- Location selection: Choose a spot away from heating vents and cold drafts, ideally in a room with moderate temperatures between 60-75°F.
- Power access: Ensure electrical outlets are nearby for grow lights and optional ventilation fans. You’ll need at least one outlet per shelf level.
- Weight capacity: Remember that wet soil and water-filled trays add considerable weight. A fully loaded four-tier shelf can weigh 200-300 pounds.
- Accessibility: Leave adequate space around the shelf for watering, harvesting, and maintenance tasks. A minimum of 2 feet of clearance.
Materials and Tools Required
Building your indoor grow shelf requires readily available materials from any home improvement store.
The total cost typically ranges from $150-300, depending on size and quality of components—significantly less than commercial systems that often exceed $500.
Structural materials:
- Four 8-foot 2×4 lumber pieces (for vertical supports)
- Eight 4-foot 2×4 lumber pieces (for horizontal supports)
- Three to four sheets of plywood or wire shelving (24″ x 48″)
- Wood screws (2.5″ and 3″ lengths)
- L-brackets for additional stability (optional but recommended)
Growing equipment:
- LED grow lights (one per shelf level, full-spectrum recommended)
- Adjustable light hangers or chains
- Plastic growing trays or containers with drainage holes
- Potting mix specifically formulated for vegetables
- Watering can with narrow spout or small pump sprayer
Tools needed:
- Power drill with Phillips head bit
- Saw (circular or hand saw)
- Level
- Measuring tape
- Pencil for marking
Step-by-Step Construction Guide
Building the Frame
Think of this like building a super sturdy bunk bed… for plants. You’re making two ladder-style sides using 2x4s.
Six feet tall is the sweet spot—tall enough to grow a lot, short enough not to feel scary. Mark where each shelf goes (about 18–20 inches apart), drill first so the wood doesn’t crack, then screw everything together tight.
I learned that lesson the hard way—splitting wood is not character-building. Once both sides are done, stand them up and connect them front and back so the whole thing doesn’t wobble like a baby giraffe.
Installing Shelves and Lighting
Drop in your shelves—wire if you want better airflow, plywood if you’re messy with water. Both work. Then hang your grow lights 6–12 inches above the plants. Greens love light like teens love Wi-Fi, so give them 12–16 hours a day.
Plug the lights into a timer so you don’t forget and accidentally turn your lettuce into sad grass.
Waterproofing and Finishing Touches
Water + floors = chaos, so protect everything. Use plastic liners or trays and lift pots slightly so roots don’t drown.
If you want the shelf to last, seal the wood with something water-resistant and non-toxic—or just leave it raw and simple. This isn’t furniture; it’s a food machine. Keep it clean, safe, and ready to grow.
Selecting the Best Winter Greens
Not all vegetables thrive under indoor growing conditions. Focus on varieties specifically suited to container growing and lower light levels compared to outdoor summer gardens.
Top-performing indoor winter greens:
- Lettuce varieties: Buttercrunch, Tom Thumb, Little Gem, and loose-leaf types mature quickly (30-45 days) and tolerate close spacing
- Spinach: Space-saving varieties like Baby Bloomsdale and Tyee produce tender leaves perfect for fresh salads
- Kale: Dwarf Blue Curled and Lacinato remain compact while providing nutrient-dense harvests
- Arugula: This fast-growing green (25-30 days to harvest) adds peppery flavor to winter meals
- Swiss chard: Bright Lights and Fordhook Giant offer both colorful stems and nutritious leaves
- Herbs: Basil, cilantro, parsley, and chives complement your greens while providing fresh seasonings
Growing Guidelines for Success
Soil and Container Selection
Your plants don’t want dirt from outside—they want the good stuff. Use containers at least 4–6 inches deep with drainage holes, or roots will straight-up drown. Grab quality potting mix, not garden soil. Think fluffy, airy, and nutrient-packed.
Fill the pots, wet the soil, and plant seeds a little closer than you would outdoors. Indoors, you’re going for constant leaf snacks, not giant lettuce heads.
Watering and Humidity Management
Indoor air in winter is dry enough to turn you into a raisin, and plants feel it too. Check soil daily with your finger—if it’s dry an inch down, water.
Keep it moist, not swampy. Too much water kills roots; too little makes leaves bitter and sad. Aim for 40–60% humidity if you can. Your greens want “chill rainforest,” not “desert apocalypse.”
Temperature and Ventilation
Greens like it cool and steady—around 60–70°F. They’re low-maintenance like that. Big temperature swings stress them out, so don’t move them around constantly. Add a small fan on low to keep air moving. It’s basically plant cardio and helps stop mold from moving in uninvited.
Fertilization Schedule
Potted plants get hungry fast. Feed them every 2–3 weeks with a diluted organic fertilizer.
Nitrogen is the MVP here—it’s what makes leaves big, green, and flex-worthy. If your greens look pale, they’re telling you they’re starving. Feed them and watch them bounce back like magic.
Harvesting and Maintaining Your Indoor Garden
Start harvesting when leaves hit about 3–4 inches—usually in 3–4 weeks. Don’t yank the whole plant like a savage. Snip the outer leaves and leave the center alone. This “cut-and-come-again” move lets one plant keep feeding you for months, which feels like cheating the system.
Plant new seeds every 2–3 weeks so you’re never stuck staring at empty shelves. Keep quick notes on what you planted and when—future you will be grateful when everything doesn’t ripen at once.
Once a month, do a cleanup. Toss dead leaves, check for tiny freeloaders like aphids, and wipe things down. Indoor gardens are chill, but pests still try it. Shut them down early with organic sprays or sticky traps and keep your mini jungle running smooth.
Troubleshooting Common Issues
- Leggy, stretched plants: Indicates insufficient light. Lower grow lights or increase daily light duration to 14-16 hours.
- Yellowing leaves: Often signals nutrient deficiency. Increase fertilization frequency or strength slightly.
- Wilting despite moist soil: May indicate root rot from overwatering or poor drainage. Reduce watering frequency and ensure adequate drainage holes.
- Bitter-tasting greens: Usually results from high temperatures or inconsistent watering. Improve environmental conditions and maintain steady moisture levels.
- Slow growth: Check temperature (may be too cool), light intensity (may be inadequate), or fertilization schedule (may need more frequent feeding).
Maximizing Your Investment
This shelf pays you back, quietly and constantly. Organic greens at the store cost way too much, and a small three-tier setup can easily save you a couple hundred bucks a year.
One pound of greens a week doesn’t sound wild until you realize that’s free salads forever. Plus, they’re fresher and actually taste like food, not sadness.
Money aside, growing plants is low-key therapy. Taking care of something alive during winter hits your brain in a good way—less stress, better mood, and that “I built this” pride that nothing online can give you.
Conclusion: Your Year-Round Growing Solution
This project flips winter on its head. For about the cost of a gaming chair and a few hours of work, you get nonstop fresh greens all year. Pulling lettuce in January feels illegal, but it’s not—it’s just smart.
Start small if you’re new. One shelf is enough to blow your mind. Once you get the hang of it, you’ll want more levels, cooler plants, and maybe even to share extras. This isn’t just about food—it’s about control, confidence, and realizing you don’t have to rely on a store for everything.


