Growing mushrooms at home is easier than ever—and honestly, way cooler than it sounds.
With food prices going up and everyone talking about sustainability, a DIY mushroom setup is like having your own secret food factory.
I remember the first time I grew oyster mushrooms in a plastic tub—I felt like a wizard pulling dinner out of thin air.
Whether you’re just starting out or leveling up your setup, this guide will show you exactly how to grow fresh, tasty fungi right where you live.
Why Choose DIY Mushroom Growing?
Growing your own mushrooms isn’t just about saving money—it’s about stepping into the future of food.
In 2025, people are going all-in on sustainability, DIY gardening, and organic eating.
Mushrooms check every box, and trust me, once you try it, you’ll get why they’re addictive (in a good way).
Key benefits include:
- Year-round production: Mushrooms don’t care if it’s summer or winter—they’ll keep popping up. I once harvested shiitakes while it was snowing outside.
- Space efficiency: You don’t need a farm; a closet, shelf, or even under your bed works. I once grew oysters in a shoebox and freaked my friends out when I lifted the lid.
- Quick harvests: Some mushrooms go from nothing to dinner in just 7–14 days. That’s faster than waiting for pizza delivery if you count how long the cravings last.
- High nutritional value: They’re little power-ups for your body—packed with protein, vitamins, and minerals. Basically, nature’s cheat code for healthy eating.
- Cost-effective: After you get your setup going, it’s way cheaper than buying fancy mushrooms at the store. Gourmet fungi without the gourmet price tag.
- Sustainability: Buckets, jars, logs, even coffee grounds—you can use all sorts of stuff that would normally get tossed.
Understanding Mushroom Growing Basics
Before you start setting up, you’ve gotta know what mushrooms actually need to stay happy.
They’re not like plants—no soil, no sunbathing required—but they do have their own “must-have” list.
Think of it like setting the perfect vibe for your fungi.
If you nail the basics—light, warmth, fresh air, and humidity—you’ll have mushrooms exploding out of your setup like magic.
Essential growing conditions:
- Temperature: Most mushrooms love the 18–24°C (55–65°F) range. Too hot or too cold and they just sulk.
- Humidity: They need it moist, around 85–95%. If the air’s too dry, mushrooms won’t even bother showing up. A cheap spray bottle can be your best friend here.
- Air circulation: Stale air is bad news—it breeds mold and weak mushrooms. Crack a window or fan things gently; they’ll thank you for the fresh vibes.
- Indirect light: Mushrooms need a little light, but not a sunburn. A dim corner works—imagine “Instagram lighting,” soft but not blasting.
- Clean environment: Sterility matters. Contamination is the real villain here. Ever opened a grow bag to find green fuzz instead of mushrooms?
Choosing Your Mushroom Varieties
Picking the right mushroom is the difference between a chill, stress-free grow and an entire weekend spent nursing a sad bag of fuzz.
Some species are mad forgiving and basically hold your hand; others expect spa-level care. Start where the mushrooms are kind.
Beginner-friendly varieties:
- Oyster Mushrooms: These are the MVPs for beginners. They do great between 15–25°C, shrug off little mistakes, grow fast, and give massive yields.
- Shiitake Mushrooms: A bit more picky but worth it for the flavor. They’re usually happiest around 20–24°C during colonization and shine on logs or sawdust blocks.
- Lion’s Mane: Looks like a fluffy white pompom and people hype it for brain-boosting perks (still being studied, but promising).
- Button Mushrooms: Classic grocery-store shrooms. They prefer about 75–77°F (that’s roughly 24–25°C), which matches most indoor temps.
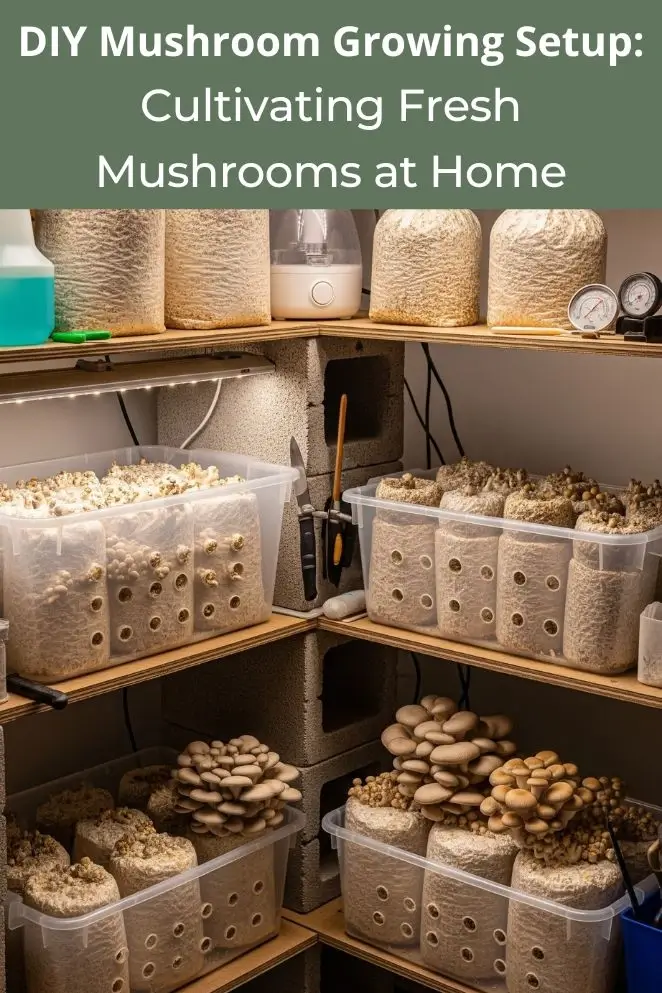
DIY Setup Options: From Simple to Advanced
Option 1: Basic Humidity Tent Setup
- Cost: $15–30
- Difficulty: Beginner
- Space required: 2×2 feet
This is the “training wheels” setup—cheap, simple, and perfect if you just wanna see mushrooms actually grow in your room.
You’ll need a clear plastic storage bin, some perlite (basically little white pebbles that hold water), and a spray bottle to keep things moist.
Materials needed:
- Large clear plastic storage container with lid
- Perlite (horticultural grade)
- Spray bottle
- Small towels or paper towels
- Mushroom growing kit or inoculated substrate
Assembly process:
Poke drainage holes in the bottom of the bin, dump in moistened perlite, then set your mushroom block on a little platform above it.
Spray it regularly so humidity stays high. I once left mine too dry and ended up with sad, cracked caps—don’t be me, mist your babies.
Option 2: Monotub Growing System
- Cost: $40–80
- Difficulty: Intermediate
- Space required: 3×2 feet
Now we’re talking. The monotub setup is like upgrading from a bike to a scooter—it’s faster, stronger, and a little more fun.
This system gives better air flow, more stable humidity, and usually bigger harvests.
Materials needed:
- 54–66 quart clear plastic tub
- Polyfill stuffing material
- Perlite
- Wire shelving or raised platform
- Hygrometer/thermometer combo
- Timer-controlled misting system (optional)
Key features:
You cut holes in the tub, stuff them with polyfill (like pillow guts) to filter air, and boom—you’ve built a mushroom mansion with its own ventilation system.
The bigger tub creates a microclimate that mushrooms love. I once came back after a weekend away and my monotub looked like a forest floor exploded inside.
Option 3: Automated Growing Chamber
- Cost: $150–400
- Difficulty: Advanced
- Space required: 4×3 feet minimum
This is the boss level. Automated chambers are like having a spaceship for your mushrooms.
Everything—humidity, airflow, temp, even light—is handled by gadgets, so your mushrooms basically live in a five-star hotel.
Essential components:
- Insulated growing tent or chamber
- Automated humidification system
- Air circulation fans with timers
- Temperature and humidity controllers
- LED grow lights
- Air filtration system
Advanced features:
Think precise controls, auto-misting schedules, and even smartphone monitoring.
Yeah, you can literally check your mushroom farm from school.
Setting Up Your Growing Environment
Humidity Control Systems
Mushrooms are divas about moisture.
While plants are cool with 40–60% humidity, fungi demand way more—usually 70–95% depending on where they are in their growth cycle.
If the air’s too dry, your mushrooms will shrivel like sad french fries.
Manual methods:
- Regular misting with spray bottles (cheap, effective, but you’ll feel like their personal butler)
- Wet towel systems (DIY humidifiers that surprisingly work)
- Perlite humidity chambers (classic trick—little rocks that hold water like champs)
Automated solutions:
- Ultrasonic humidifiers (basically turn water into fog, mushrooms love it)
- Timer-controlled misting systems (set it and forget it)
- Humidity controllers with sensors (fancy gadgets that keep levels perfect without you babysitting)
Temperature Management
Mushrooms are also picky about temperature.
During incubation (when the spores or mycelium are colonizing the substrate), you want things at a cozy 20–24°C.
Too cold and they drag their feet, too hot and—worse—you’re inviting nasty contaminants to the party.
Heating options:
- Seedling heat mats (cheap, safe, and easy)
- Space heaters with thermostats (great for bigger setups, just don’t roast your room)
- Heated growing chambers (next-level, but effective)
Cooling solutions:
- Ventilation fans (keep the air moving, also helps with heat)
- Air conditioning units (luxury shrooms, anyone?)
- Evaporative cooling systems (cooler plus fan = budget AC)
Air Circulation and Filtration
Fresh air is non-negotiable. Mushrooms breathe oxygen just like us, so if the air goes stale, contamination shows up fast and growth slows down.
Keep things moving, but gently—you don’t want to blow your mushrooms away.
Ventilation components:
- Computer fans for gentle air movement (cheap and quiet, gamer PC style)
- HEPA filters for incoming air (block out mold spores like bouncers at a club)
- Carbon filters for odor control (your room won’t smell like a swamp)
- Timer controls for circulation cycles (set it on a schedule so you don’t forget)
Substrate Preparation and Inoculation
The “substrate” is basically mushroom food—the stuff your fungi eat to grow strong and multiply.
Different shrooms have different tastes.
Think of it like picking snacks: some want straw, others want wood, and some will happily munch on your leftover coffee grounds.
Common substrate materials:
- Straw (wheat, rice, barley—basically farm leftovers turned into mushroom buffets)
- Sawdust and wood chips (shiitake especially loves this—wood is its natural playground)
- Coffee grounds and agricultural waste (yes, the stuff you almost tossed—mushrooms are eco-warriors)
- Commercial growing mixes (pre-made blends if you want to skip the DIY chaos)
Sterilization methods:
- Steam sterilization in pressure cookers (classic—imagine a pressure cooker acting like a fungi spa)
- Pasteurization using hot water baths (dunk the substrate in hot water to kill the bad guys)
- Lime treatment for straw substrates (a quick chemistry hack that mushrooms dig)
Inoculation techniques:
- Spore syringes for liquid inoculation (literally squirting mushroom “seeds” into the substrate)
- Grain spawn for solid substrate colonization (fast, reliable, and beginner-friendly—like giving your mushrooms a head start)
- Tissue culture from fresh mushrooms (advanced wizardry—cloning mushrooms straight from a living piece)
Maintaining Your Growing System
Daily Management Tasks
Running a mushroom setup is kinda like having pets—you can’t just forget about them.
They need regular check-ins, but the payoff is watching them grow like crazy.
Monitoring requirements:
- Check temperature and humidity levels twice a day (morning and night is perfect).
- Inspect for contamination or pests—green fuzz = mold, tiny gnats = bad news.
- Adjust misting schedules depending on how your mushrooms look (dry caps mean they’re thirsty).
- Document growth and harvest timing—yes, journaling your mushroom farm makes you feel like a scientist.
Weekly maintenance:
- Clean and sterilize all your equipment—wiping down with alcohol keeps the bad microbes out.
- Replace air filters if things look clogged.
- Harvest mushrooms as soon as they’re ready—wait too long and they’ll start dropping spores everywhere.
- Prep new substrate batches so you always have the next grow in line.
Troubleshooting Common Issues
- Low humidity problems: If mushrooms look dry, cracked, or stop growing, bump up misting or add another humidity trick (like a wet towel or extra perlite).
- Contamination prevention: Sterile = survival. Always wipe tools and your hands with alcohol before touching stuff.
- Temperature fluctuations: Mushrooms hate rollercoaster temps. Use heaters, AC, or even insulation to keep it steady.
Conclusion
Growing mushrooms at home is one of the easiest ways to dip your toes into sustainable food production.
Whether you start with a cheap humidity tent or go all-in with a high-tech chamber, success comes down to keeping the environment just right—steady temps, high humidity, fresh air, and cleanliness.
The cool part? Your setup pays for itself fast.
You’ll cut down grocery costs and flex on your friends when you serve mushrooms you literally grew yourself.


